Tutorial 3: Custom GLSL Shaders, Sending Data to the Graphics Card
To get the most out of our graphics, many newer graphics engines use programs running on the graphics card called “shaders” to specify how objects should be shown on-screen. While teaching GLSL shaders is beyond the scope of this tutorial, and ratcave allows you to completely skip writing shaders at all by supplying a few useful ones, you’ll likely want to use a shader of your own.
In this tutorial, you’ll learn how to use ratcave to:
- Compile a
Shaderobject and use it in theScene.draw()function.- Send data to the shader from Python as a
Uniformvariable.
Warning
This tutorial builds on the previous tutorials. If you’re just getting started, it’s recommended to go back and do those tutorials first!
Initial Script
Since the previous tutorials have already covered a lot of ratcave methods, let’s just start with the following script:
import pyglet
import ratcave as rc

# Create window and OpenGL context (always must come first!)
window = pyglet.window.Window()

# Load Meshes and put into a Scene
obj_reader = rc.WavefrontReader(rc.resources.obj_primitives)
torus = obj_reader.get_mesh('Torus', position=(0, 0, -2))

scene = rc.Scene(meshes=[torus])

# Constantly-Running mesh rotation, for fun
def update(dt):
    torus.rotation.y += 20. * dt
pyglet.clock.schedule(update)


# Draw Function
@window.event
def on_draw():
    with rc.default_shader:
        scene.draw()

# Pyglet's event loop run function
pyglet.app.run()
This code should display a rotating torus on the window.

Creating a Custom GLSL Shader
Now, one thing ratcave does automatically is use it’s built-in genShader Shader, if none is specified. This is
to make it easier to get started. Let’s replace it with our own custom shader program, which simply positions the mesh in 3D space.
Shader programs come in two types. Vertex Shaders tell the graphics card where a vertex will appear on your screen. Our shader here will take data from the meshes, the lights, and the camera to determine where everything goes:
vert_shader = """
 #version 120
 attribute vec4 vertexPosition;
 uniform mat4 projection_matrix, view_matrix, model_matrix;

 void main()
 {
     gl_Position = projection_matrix * view_matrix * model_matrix * vertexPosition;
 }
 """
Warning
This shader requires OpenGL 3.3 drivers to be installed, along with an OpenGL 3.3-compatible graphics card on your system.
The fragment shader takes the vertex shader’s position data determines what color a pixel on the screen will be. These can get quite complex, but we’ll use a fairly simple one here, and just make everything automatically appear red:
frag_shader = """
 #version 120
 uniform vec3 diffuse;
 void main()
 {
     gl_FragColor = vec4(diffuse, 1.);
 }
 """
Note
Normally, you would just put these shaders in their own files, but here we’ll keep everything together and use them as strings.
Now, to make the Shader
shader = rc.Shader(vert=vert_shader, frag=frag_shader)
Using the shader during drawing is done in a shader keyword argument in Scene.draw():
scene.draw(shader=shader)
Here is what the code should look like now:
import pyglet
import ratcave as rc
import time
import math

vert_shader = """
 #version 120
 attribute vec4 vertexPosition;
 uniform mat4 projection_matrix, view_matrix, model_matrix;

 void main()
 {
     gl_Position = projection_matrix * view_matrix * model_matrix * vertexPosition;
 }
 """

frag_shader = """
 #version 120
 uniform vec3 diffuse;
 void main()
 {
     gl_FragColor = vec4(diffuse, 1.);
 }
 """

shader = rc.Shader(vert=vert_shader, frag=frag_shader)

# Create window and OpenGL context (always must come first!)
window = pyglet.window.Window()

# Load Meshes and put into a Scene
obj_reader = rc.WavefrontReader(rc.resources.obj_primitives)
torus = obj_reader.get_mesh('Torus', position=(0, 0, -2))
torus.uniforms['diffuse'] = [.5, .0, .8]

scene = rc.Scene(meshes=[torus])

# Constantly-Running mesh rotation, for fun
def update(dt):
    torus.rotation.y += 20. * dt
pyglet.clock.schedule(update)


def update_color(dt):
    torus.uniforms['diffuse'][0] = 0.5 * math.sin(time.clock() * 30) + .5
pyglet.clock.schedule(update_color)


# Draw Function
@window.event
def on_draw():
    with shader:
        scene.draw()


# Pyglet's event loop run function
pyglet.app.run()
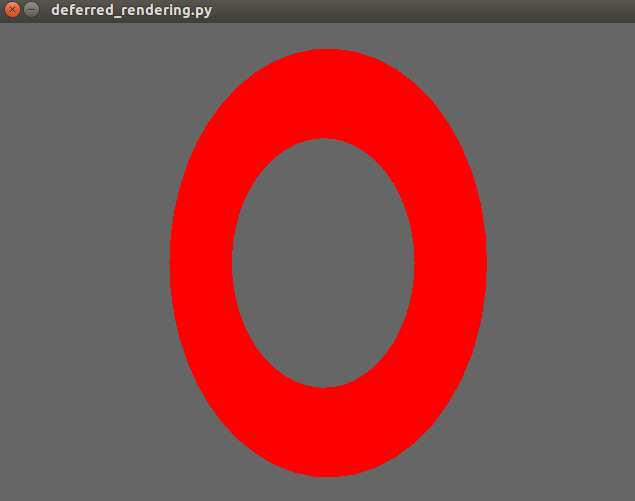
If you run it, you should see a flat red torus!
Sending Data to the Shader using Uniforms
Data can be attached to each object and sent to the shaders, to customize their behavior. Here, let’s let the
Mesh.uniforms['diffuse']() uniform control what color the torus takes.
In the fragment shader, add this line to initialize the diffuse uniform variable before the main function:
uniform vec3 diffuse;
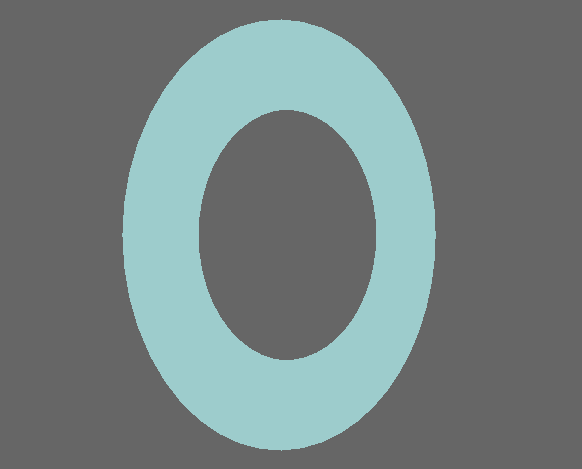
In the python code, modify the diffuse key in the Mesh.uniforms() attribute:
torus.uniforms['diffuse'] = [.2, .8, .8]
Note
All ratcave objects come with some default uniforms, to make setting up easier and to make naming schemas more consistent. This shouldn’t restrict you, though–new uniforms are automatically initialized when you add them dictionary-style, like torus.uniforms[‘my_uniform’] = 3.0!
If you run the code now, you should now see a cyan rotating torus. Let’s make it a little more dynamic, shall we?
import time
import math
def update_color(dt):
    torus.uniforms['diffuse'][0] = 0.5 * math.sin(time.clock()) + 1
pyglet.clock.schedule(update_color)
Now the torus will change color!
Summary
Here’s the updated code:
import pyglet
import ratcave as rc
import time
import math

vert_shader = """
 #version 330

 layout(location = 0) in vec3 vertexPosition;
 uniform mat4 projection_matrix, view_matrix, model_matrix;
 out vec4 vVertex;

 void main()
 {
     vVertex = model_matrix * vec4(vertexPosition, 1.0);
     gl_Position = projection_matrix * view_matrix * vVertex;
 }
 """

frag_shader = """
 #version 330
 out vec4 final_color;
 uniform vec3 diffuse;
 void main()
 {
     final_color = vec4(diffuse, 1.);
 }
 """

shader = rc.Shader(vert=vert_shader, frag=frag_shader)

# Create window and OpenGL context (always must come first!)
window = pyglet.window.Window()

# Load Meshes and put into a Scene
obj_reader = rc.WavefrontReader(rc.resources.obj_primitives)
torus = obj_reader.get_mesh('Torus', position=(0, 0, -2))
torus.uniforms['diffuse'] = [.5, .0, .8]

scene = rc.Scene(meshes=[torus])

# Constantly-Running mesh rotation, for fun
def update(dt):
    torus.rotation.y += 20. * dt
pyglet.clock.schedule(update)


def update_color(dt):
    torus.uniforms['diffuse'][0] = 0.5 * math.sin(time.clock() * 10) + .5
pyglet.clock.schedule(update_color)


# Draw Function
@window.event
def on_draw():
    with shader:
        scene.draw()


# Pyglet's event loop run function
pyglet.app.run()
In the next tutorial, we’ll follow this up by drawing to an FBO dynamically!