Tutorial 2: Animating a Scene with Multiple Meshes and Moving the Camera with the Keyboard
This tutorial will build on the previous one by adding some more interesting elements. We’ll allow the user to move the scene’s camera by pressing the left and right arrow keys, and have multiple meshes in the scene that move.
Warning
This tutorial builds on code from Tutorial 1. If you have not yet completed Tutorial 1, it’s best to go and do that, first!
Scenes Hold Lists of Meshes
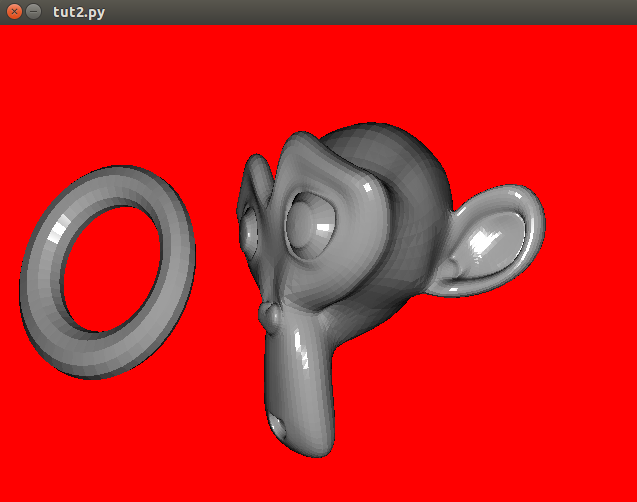
Let’s insert a couple Meshes from our obj_reader WavefrontReader object into the scene!:
# Create Meshes from WavefrontReader
monkey = obj_reader.get_mesh("Monkey", position=(0, 0, -1.5), scale=.6)
torus = obj_reader.get_mesh("Torus", position=(-1, 0, -1.5), scale=.4)

# Create Scenes with Meshes.
scene = rc.Scene([monkey, torus])
Moving a Mesh
Now, we’ll animate the Meshes by changing their rotation attributes in the update function:
def rotate_meshes(dt):
    monkey.rotation.y += 15 * dt  # dt is the time between frames
    torus.rotation.x += 80 * dt
pyglet.clock.schedule(rotate_meshes)
Modifying Scene’s Background Color
Scenes also have a background color, saved as an RGB tuple in the Scene.bgColor attribute:
scene.bgColor = 1, 0, 0
Moving the Camera with the Keyboard
While we could easily make a new Camera object from scratch, we’ll just grab the scene’s camera and have it accept keyboard inputs for movement:
# This is how to get keyboard input in pyglet:
from pyglet.window import key
keys = key.KeyStateHandler()
window.push_handlers(keys)

def move_camera(dt):
  camera_speed = 3
  if keys[key.LEFT]:
      scene.camera.x -= camera_speed * dt
  if keys[key.RIGHT]:
      scene.camera.x += camera_speed * dt
pyglet.clock.schedule(move_camera)
Now you should have an interactive scene! Don’t forget to use the arrow keys to move around!
Summary
Here’s the full code for Tutorial 2:
import pyglet
from pyglet.window import key
import ratcave as rc

# Create Window and Add Keyboard State Handler to it's Event Loop
window = pyglet.window.Window()
keys = key.KeyStateHandler()
window.push_handlers(keys)

# Insert filename into WavefrontReader.
obj_filename = rc.resources.obj_primitives
obj_reader = rc.WavefrontReader(obj_filename)

# Create Mesh
monkey = obj_reader.get_mesh("Monkey", position=(0, 0, -1.5), scale=.6)
torus = obj_reader.get_mesh("Torus", position=(-1, 0, -1.5), scale=.4)

# Create Scene
scene = rc.Scene(meshes=[monkey, torus])
scene.bgColor = 1, 0, 0


# Functions to Run in Event Loop
def rotate_meshes(dt):
    monkey.rotation.y += 15 * dt  # dt is the time between frames
    torus.rotation.x += 80 * dt
pyglet.clock.schedule(rotate_meshes)


def move_camera(dt):
    camera_speed = 3
    if keys[key.LEFT]:
        scene.camera.position.x -= camera_speed * dt
    if keys[key.RIGHT]:
        scene.camera.position.x += camera_speed * dt
pyglet.clock.schedule(move_camera)


@window.event
def on_draw():
    with rc.default_shader:
        scene.draw()


pyglet.app.run()
PsychoPy Version
Here’s the same scenario, done in PsychoPy:
from psychopy import visual, event
import ratcave as rc

camera_speed = 2

# Create Window and Add Keyboard State Handler to it's Event Loop
window = visual.Window()

# Insert filename into WavefrontReader.
obj_filename = rc.resources.obj_primitives
obj_reader = rc.WavefrontReader(obj_filename)

# Create Mesh
monkey = obj_reader.get_mesh("Monkey", position=(0, 0, -1.5), scale=.6)
torus = obj_reader.get_mesh("Torus", position=(-1, 0, -1.5), scale=.4)

# Create Scene
scene = rc.Scene(meshes=[monkey, torus])
scene.bgColor = 1, 0, 0

while True:

    dt = .016

    keys_pressed = event.getKeys()
    if 'escape' in keys_pressed:
        window.close()
        break

    # Move Camera
    for key in keys_pressed:
        if key == 'left':
            scene.camera.x -= camera_speed * dt
        elif key == 'right':
            scene.camera.x += camera_speed * dt

    # Rotate Meshes
    monkey.rot_y += 15 * dt  # dt is the time between frames
    torus.rot_x += 80 * dt

    # Draw Scene and Flip to Window
    with rc.default_shader:
        scene.draw()
    window.flip()